:= 变量赋值
最简单的iss脚本
[setup]
AppName=Test
AppVerName=TEST
;默认安装路径
DefaultDirName="C:UsersouDesktop新建文件夹 (3)source"
AppVersion=1.0
[files]
;需要加进安装包的文件
Source: "C:UsersouDesktop新建文件夹 (3)sourceElegoo 3D Print for test.exe"; DestDir: "{app}"
修改安装时的图片
[setup]
AppName=Test
AppVerName=TEST
DefaultDirName="E:TEST"
AppVersion=1.0
WizardImageFile=dh.bmp

[files]
Source: "F:desktopipmsg.exe"; DestDir: "{app}"
指定压缩方式
Setup段中的compression指定了采用的压缩方式,较高的压缩率需要较多的时间或者需要更大的内存空间,可用的值如下:
zip
zip/1到zip/9
bzip
bzip/1 到bzip/9
lzma
lzma/fast
lzma/normal
lzma/max
lzma/ultra
lzma/ultra64
lzma2
lzma2/fast
lzma2/normal
lzma2/max
lzma2/ultra
lzma2/ultra64
none
其中lzma2/max是编译器使用的默认压缩方式,另外,lzma/ultra、lzma/ultra64、lzma2/ultra和lzma2/ultra64在使用前需要审查一下内存需求。Zip方式的压缩算法比较快,并且在压缩和解压的时候只需要很低的内存空间(不超过1M),但是压缩并不如其他的方式好,zip和lzma算法一样,有一个很特别的属性:对不可压缩文件(例如已经被压缩过的文件)直接跳过,默认的压缩级别是7(可用的是1-9)
Bzip是bzip2压缩器采用的方法,通常比zip方法压缩好,但是压缩速度比较慢,同时需要占用更大的内存空间,通常在压缩的时候是8M,解压的时候则是4M,默认的压缩级别是9(可用的是1-9)
Lzma则是7-Zip LZMA压缩器采用的方法,相比前面的zip和bzip压缩算法,效果明显好一些,但是也要占用较多的内存,速度也比较慢。
Lzma2是7-Zip LZMA2压缩器采用的方法,该算法是lzma的改进版,能对不可压缩文件提供更好的比率,并可对大文件实现多部分同步压缩。同样地,该算法也要消耗较大的内存。
None显然是不使用任何压缩方法。
可以根据自己的文件特性选择合适的压缩算法,个人认为就目前的情况而言,一般的打包使用默认的压缩算法即可。
为程序创建桌面快捷方式
[setup]
;全局设置,本段必须
AppName=Test
AppVerName=TEST
DefaultDirName="E:TEST"
AppVersion=1.0
[files]
Source: "F:desktopipmsg.exe"; DestDir: "{app}"
[icons]
Name: "{userdesktop}飞鸽传书";Filename: "{app}ipmsg.EXE"; WorkingDir: "{app}"
Name:要创建的快捷方式的名字和位置,上例中将会在当前用户的桌面创建一个名为“飞鸽传书”快捷图标,该选项是是必须的。
FileName:快捷方式的命令行文件名,即快捷方式指向的实际可执行文件,这里是ipmsg.exe文件,该项为必须的。
Parameters:快捷方式的可选命令行参数,如果编写的是一个命令行方式的可执行文件,额可以通过该选项传递参数,一般的可执行文件都不需要该选项。
WorkingDir:快捷方式的工作 (或启动) 目录,就是指示程序在哪个目录开始运行。
HotKey:快捷方式的热键 (或快捷键) 设置,就是可以用于启动程序的组合键
Comment:指定快捷方式的注释 (或描述) 对象,当鼠标移动到该快捷方式上的时候会有一个黄色的小窗口给出提示,一般是该程序的描述。
IconFileName:要显示的自定义图标文件名。这可以是一个包含图标文件的可执行映像即.exe或者.dll)也可以是一个.ico 文件,默认会采用原可执行文件的图标。
IconIndex:指定的文件中使用的以零为基点的图标索引,这是因为有些Icon可以存放在.dll文件中,例如操作系统中的shell32.dll文件,保存有100多个图标,如果IconFileName指定的是该文件(一般位于C:WINDOWSsystem32目录下),那么IconIndex就指定了使用哪个图标。
添加readme文件(可以是任何格式的)
[setup]
;全局设置,本段必须
AppName=Test
AppVerName=TEST
DefaultDirName="E:TEST"
AppVersion=1.0
[files]
Source: "F:desktoptestipmsg.exe"; DestDir: "{app}";
Source: "F:desktoptestreadme.txt"; DestDir: "{app}";Flags:isreadme
在程序目录下创建文件
[setup]
;全局设置,本段必须
AppName=Test
AppVerName=TEST
DefaultDirName="E:TEST"
AppVersion=1.0
[files]
Source: "F:desktoptestipmsg.exe"; DestDir: "{app}";
Source: "F:desktoptestreadme.txt"; DestDir: "{app}";Flags:isreadme
[dirs]
Name:"{app}WorkDir"
安装好之后会在安装目录下创建一个新的文件夹WorkDir
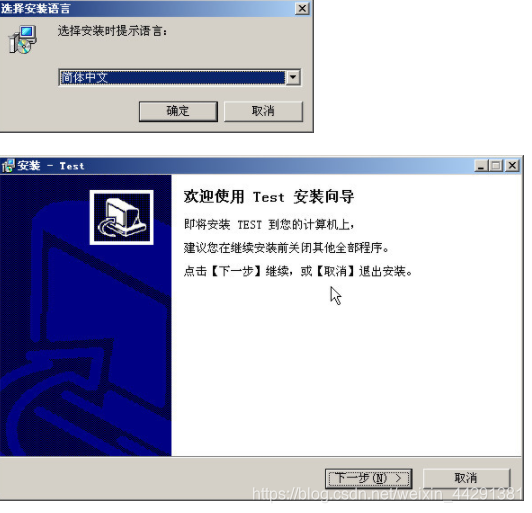
提供安装语言选项
[setup]
;全局设置,本段必须
AppName=Test
AppVerName=TEST
DefaultDirName="E:TEST"
AppVersion=1.0
Compression=lzma2/max
ShowLanguageDialog=no
[languages]
Name: "en"; MessagesFile: "compiler:Default.isl"

[files]
Source: "C:UsersouDesktop新建文件夹 (3)sourceElegoo 3D Print for test.exe"; DestDir: "{app}";
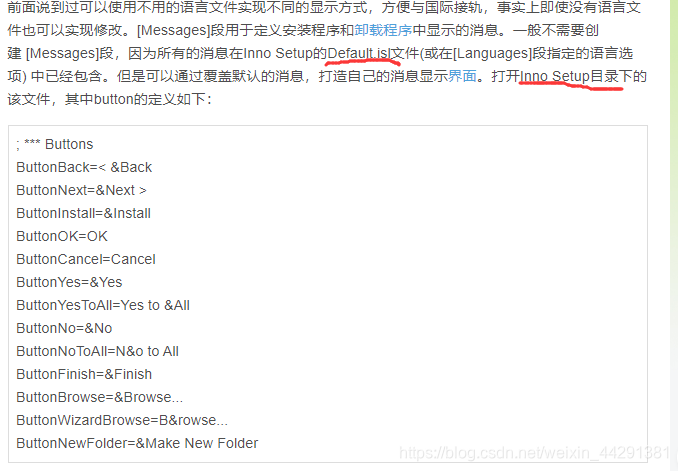
上例中需要提到的是段中需要加入ShowLanguageDialog=yes,其实不加也是可以的,因为ShowLanguageDialog默认是yes。
安装过程中会根据用户的选择采用不同的语言界面:
有选择性的安装文件
DefaultDirName="E:TEST"
AppVersion=1.0
Compression=lzma2/max
ShowLanguageDialog=no

[Components]
Name: main; Description:"主程序(必选)";Types:full compact custom;Flags: fixed
Name: data; Description:"数据文件";Types:full
Name: help;Description:"帮助文件";Types:full

[files]
Source: "C:UsersouDesktop新建文件夹 (3)sourceElegoo 3D Print for test.exe"; DestDir: "{app}";Components:main
Source: "C:UsersouDesktop新建文件夹 (3)sourceououtest.md"; DestDir: "{app}";Components:data
Source: "C:UsersouDesktop新建文件夹 (3)source123.xls"; DestDir: "{app}" ;Components:help

标志位设置为fixed,将确保主程序必定安装
修改安装过程中的文字显示
[setup]
;全局设置,本段必须
AppName=Test
AppVerName=TEST
DefaultDirName="E:TEST"
AppVersion=1.0
Compression=lzma2/max
ShowLanguageDialog=yes
[files]
Source: "C:UsersouDesktop新建文件夹 (3)sourceElegoo 3D Print for test.exe"; DestDir: "{app}";
[Messages]
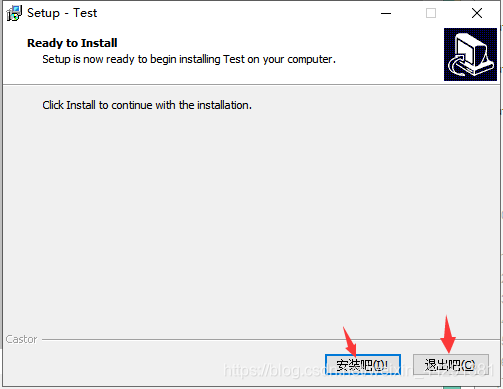
BeveledLabel=Castor
ButtonNext=继续吧(&F)>
ButtonBack=返回吧(&B)<
ButtonCancel=退出吧(&C)
ButtonInstall=安装吧(&I)!
ButtonFinish=搞定(&X)~~
操作注册表
有些程序需要随系统启动,或者需要建立某些文件关联等问题,这些都是通过在安装程序中对注册表进行操作的结果。Inno Setup中通过段实现对注册表的操作。
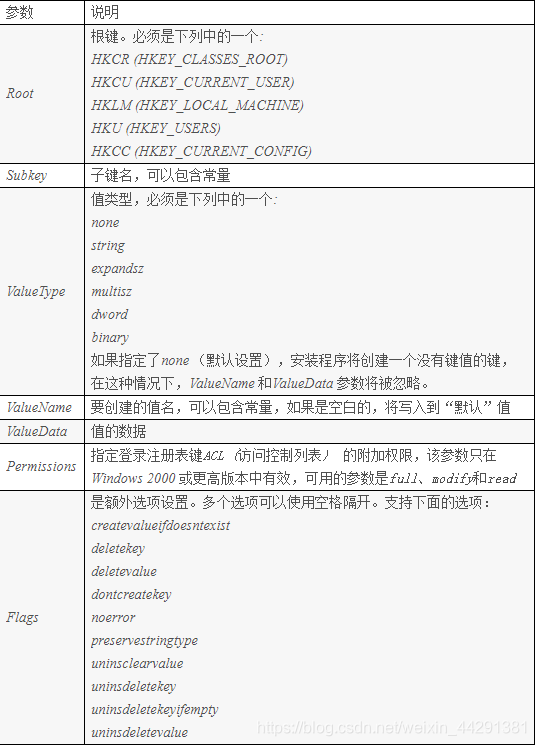
[setup]
;全局设置,本段必须
AppName=Test
AppVerName=TEST
DefaultDirName="C:UsersouDesktop新建文件夹 (3)新建文件夹"
AppVersion=1.0
Compression=lzma2/max
ShowLanguageDialog=yes
[files]
Source: "C:UsersouDesktop新建文件夹 (3)sourceElegoo 3D Print for test.exe"; DestDir: "{app}";
[registry]
;本段处理程序在注册表中的键值
Root:HKLM;Subkey:SOFTWAREMicrosoftWindowsCurrentVersionRun;ValueType: string; ValueName:TEST;ValueData:{app}ipmsg.exe;Flags: uninsdeletevalue
由于使用的标志位是uninsdeletevalue,所以卸载软件将会自动删除该值,如果使用uninsdeletekey的话,该键下的其他值都会被删除,这不是一个很好的方法,除非你确定使用的是自己的专用键,否则不推荐使用。
完成安装后执行某些程序
测试下面代码生成的打包文件,运行到最后出现finish之前,将会等待run段下的程序(.exe文件)执行完毕后方可继续运行。
[setup]
;全局设置,本段必须
AppName=Test
AppVerName=TEST
DefaultDirName="C:UsersouDesktop新建文件夹 (3)新建文件夹"
AppVersion=1.0
Compression=lzma2/max
ShowLanguageDialog=yes
[files]
Source: "C:UsersouDesktop新建文件夹 (3)sourceElegoo 3D Print for test.exe"; DestDir: "{app}";
[run]
Filename: "C:UsersouDesktop新建文件夹 (3)sourceElegoo 3D Print for test.exe";
Pascal脚本(1)
[Code]
在安装程序初始化时调用,返回False 将中断安装,True则继续安装,测试代码如下:
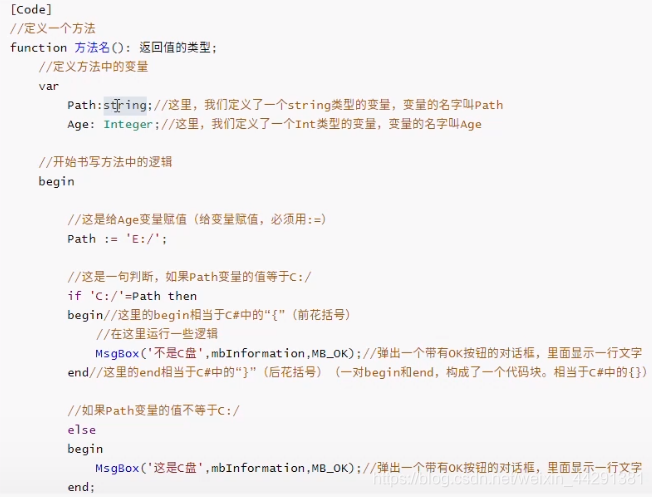
function InitializeSetup(): Boolean;
begin
Result := MsgBox('安装程序正在初始化,你确定要安装吗?', mbConfirmation, MB_YESNO) = idYes;
if Result = False then
MsgBox('你放弃了安装,程序直接退出', mbInformation, MB_OK);
end;
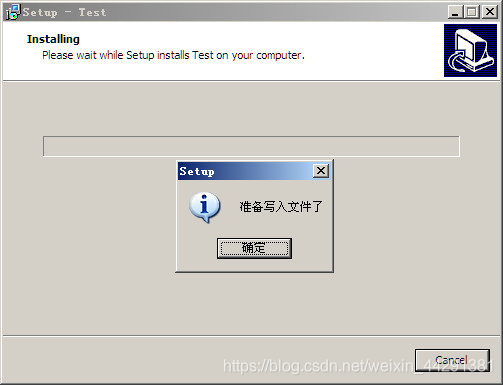
该过程提供用户完成预安装和安装之后的任务,更多的是提供了安装过程中的状态。参数CurStep=ssInstall是在程序实际安装前(所有的路径等都配置好之后准备写入文件钱),CurStep=ssPostInstall是实际安装完成后,而CurStep=ssDone是在一次成功的安装完成后、安装程序终止前(即点击finish按钮后执行)。测试代码如下:
procedure CurStepChanged(CurStep: TSetupStep);
begin
if CurStep=ssinstall then
MsgBox('准备写入文件了', mbInformation, MB_OK);
if CurStep=ssPostinstall then
MsgBox('文件复制完成', mbInformation, MB_OK);
if CurStep=ssDone then
MsgBox('软件成功安装', mbInformation, MB_OK);
end;
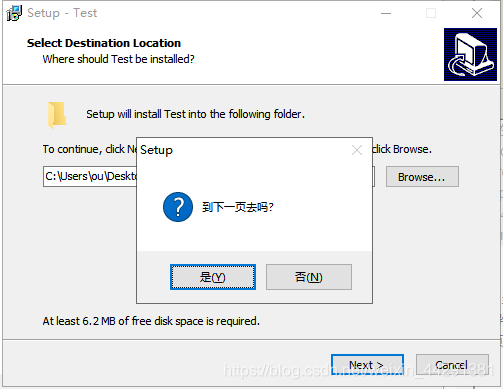
当用户单击下一步按钮时调用。如果返回True,向导将移到下一页;如果返回False,它仍保留在当前页。测试代码如下
function NextButtonClick(CurPageID: Integer): Boolean;
begin
Result := MsgBox('到下一页去吗?', mbConfirmation, MB_YESNO) = idYes;
end;
Pascal脚本(2)
自动显示密码页并调用CheckPassword检查密码。返回True 表示接受密码,返回False拒绝。测试代码如下:
function CheckPassword(Password: String): Boolean;
begin
if Password='castor' then
result:=true;
end;
如果返回True,安装程序在安装结束时提示用户重启系统,False则不提示。测试代码如
function NeedRestart(): Boolean;
begin
result:=True;
end;
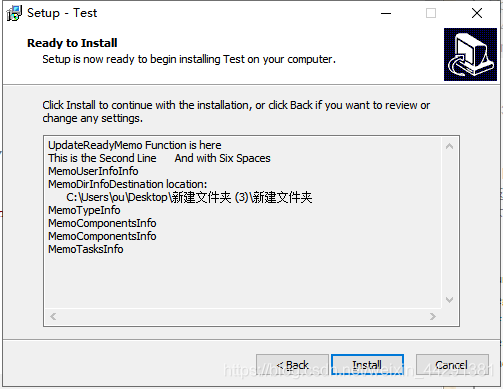
在Ready to Install页面变为活动页的时候自动调用该函数,该函数返回一段文本,该文本显示于Ready to Install页面中的设置备注中
function UpdateReadyMemo(Space, NewLine, MemoUserInfoInfo, MemoDirInfo, MemoTypeInfo, MemoComponentsInfo, MemoComponentsInfo, MemoTasksInfo: String): String;
var
res: String;
begin
res:='UpdateReadyMemo Function is here'+NewLine+'This is the Second Line';
res:=res+Space+'And with Six Spaces';
res:=res+NewLine+'MemoUserInfoInfo'+MemoUserInfoInfo;
res:=res+NewLine+'MemoDirInfo'+MemoDirInfo;
res:=res+NewLine+'MemoTypeInfo'+MemoTypeInfo;
res:=res+NewLine+'MemoComponentsInfo'+MemoComponentsInfo;
res:=res+NewLine+'MemoComponentsInfo'+MemoComponentsInfo;
res:=res+NewLine+'MemoTasksInfo'+MemoTasksInfo;
Result:=res;
end;
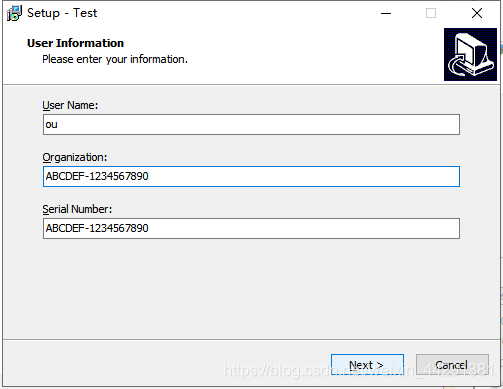
该函数将在用户信息向导页中自动出现一个序列号对象 (前提是段中使用UserInfoPage=yes)
function CheckSerial(Serial: String): Boolean;
begin
if Serial='ABCDEF-1234567890' then
Result:=True;
end;
替换安装程序和卸载程序的图标
安装文件图标 Setup段
SetupIconFile=jiong.ico
安装和卸载图标不一样
[code]
//插件函数用法
//参数:句柄(插件错误对话框的父句柄), exe文件完整路径名称, (exe文件中要替换的)图标资源名称,图标文件的完整路径名称, (exe中要替换的图标资源所在)语系
//返回值:成功 = Tr, 失败 = False
function UpdateIcon(const hWnd: Integer; const exeFileName, exeIcon, IcoFileName: String; wlangID: DWORD): Boolean;
external 'UpdateIcon@files:UpdateIcon.dll stdcall';

//替换卸载程序的图标
function UpdateUninstIcon(const IcoFileName: String): Boolean;
begin
//要替换图标的exe文件路径名称留空,则插件会自动替换掉Inno卸载程序的图标,其它参数类似!
Result:= UpdateIcon(MainForm.Handle, '', '', IcoFileName, 0);
//替换卸载图标
end;

procedure CurStepChanged(CurStep: TSetupStep);
var
sIcon: String;
begin
//注意:替换卸载程序的图标,必须是在卸载程序生成之前!
//安装图标与卸载图标的格式与大小一致,否则可能会导致卸载程序出错!
if CurStep=ssInstall then
begin
sIcon:= ExpandConstant('{tmp}uninstall.ico'); //定义卸载图标
ExtractTemporaryFile(ExtractFileName(sIcon)); //释放卸载图标
//要替换图标的exe文件路径名称留空,则插件会自动替换掉Inno卸载程序的图标!
UpdateUninstIcon(sIcon);//替换卸载图标
end;
end;
Inno Setup类参考
下面的程序将会创建一个最简单的自定义页面,并显示在欢迎页面后面:
[setup]
;全局设置,本段必须
AppName=Test
AppVerName=TEST
DefaultDirName="C:UsersouDesktop新建文件夹 (3)新建文件夹"
AppVersion=1.0
Compression=lzma2/max
ShowLanguageDialog=yes
UserInfoPage=yes
[files]
Source: "C:UsersouDesktop新建文件夹 (3)sourceElegoo 3D Print for test.exe"; DestDir: "{app}";
[code]
procedure InitializeWizard();
begin
CreateCustomPage(wpWelcome, '标题:自定义页面', '描述:这是我的自定义页面');
end;
Inno Setup类参考(2)
如何在自定义页面上添加按钮
[code]
var
myPage:TwizardPage;
myBtn:TButton;
procedure InitializeWizard();
begin
myPage:=CreateCustomPage(wpWelcome, '标题:自定义页面', '描述:这是我的自定义页面');
myBtn:=TButton.Create(nil);
myBtn.Parent:=myPage.Surface;
end;
var
myPage:TwizardPage;
myBtn:TButton;
myFont:TFont;
procedure ClickmyBtn(Sender: TObject);
begin
MsgBox('你点击了按钮~~', MBInformation, MB_OK);
end;

procedure InitializeWizard();
begin
myPage:=CreateCustomPage(wpWelcome, '标题:自定义页面', '描述:这是我的自定义页面');
myBtn:=TButton.Create(myPage);
myBtn.Parent:=myPage.Surface;
myBtn.Caption:='点我~';
myBtn.Default:=True;
myFont:=TFont.Create();
myFont.Size:=16;
myFont.Style:=[fsBold];
myFont.Style:=myFont.Style+[fsItalic];
(*或者使用
myFont.Style:=[fsBold,fsItalic];
*)
myBtn.Font:=myFont;
myBtn.Width:=300;
myBtn.Height:=100;
myBtn.OnClick:=@ClickmyBtn;
end;
Inno Setup类参考(3)
标签(Label)
[setup]
;全局设置,本段必须
AppName=Test
AppVerName=TEST
DefaultDirName="C:UsersouDesktop新建文件夹 (3)新建文件夹"
AppVersion=1.0
Compression=lzma2/max
ShowLanguageDialog=yes
UserInfoPage=yes
[files]
Source: "C:UsersouDesktop新建文件夹 (3)sourceElegoo 3D Print for test.exe"; DestDir: "{app}";
[code]
var
       myPage:TwizardPage;
       myBtn:TButton;
       myLbl:TLabel;
procedure ClickmyBtn(Sender: TObject);
begin
    myLbl.Caption:='你点击了按钮~';
       myLbl.Color:=clRed;
end;
procedure InitializeWizard();
begin
       myPage:=CreateCustomPage(wpWelcome, '标题:自定义页面', '描述:这是我的自定义页面');
       myBtn:=TButton.Create(myPage);
       myBtn.Parent:=myPage.Surface;
       myBtn.Caption:='点我~';
       myBtn.OnClick:=@ClickmyBtn;
       myLbl:=TLabel.Create(myPage);
       myLbl.Parent:=myPage.Surface;
       myLbl.Top:=myBtn.Top+100;

       myLbl.Caption:='我是标签~';
end;
双击和单击
[setup]
;全局设置,本段必须
AppName=Test
AppVerName=TEST
DefaultDirName="C:UsersouDesktop新建文件夹 (3)新建文件夹"
AppVersion=1.0
Compression=lzma2/max
ShowLanguageDialog=yes
UserInfoPage=yes
[files]
Source: "C:UsersouDesktop新建文件夹 (3)sourceElegoo 3D Print for test.exe"; DestDir: "{app}";
[code]
var
       myPage:TwizardPage;
       myBtn:TButton;
       myLbl:TLabel;
procedure ClickmyBtn(Sender: TObject);
begin
       myLbl.Caption:='你点击了按钮~';
      myLbl.Color:=clRed;
end;
procedure ClickMyLbl(Sender: TObject);
begin
       MsgBox('你单击了标签', MBInformation, MB_OK);
end;
procedure DbClickMyLbl(Sender: TObject);
begin
       MsgBox('你双击了标签', MBInformation, MB_OK);
end;
procedure InitializeWizard();
begin
       myPage:=CreateCustomPage(wpWelcome, '标题:自定义页面', '描述:这是我的自定义页面');
       myBtn:=TButton.Create(myPage);
       myBtn.Parent:=myPage.Surface;
       myBtn.Caption:='点我~';
       //myBtn.OnClick:=@ClickmyBtn;
       myLbl:=TLabel.Create(myPage);
       myLbl.Parent:=myPage.Surface;
       myLbl.Top:=myBtn.Top+50;
       myLbl.Caption:='我是标签~';
       myLbl.OnDblClick:=@DbClickMyLbl;
    //myLbl.OnClick:=@ClickMyLbl;
end;
Inno Setup类参考(4)
文本框,是典型的窗口可视化组件,既可以用来输入文本,也可以用来显示文本
[code]
var
       myPage:TwizardPage;
       myBtn:TButton;
       ed1,ed2,ed3:TEdit;
procedure ClickmyBtn(Sender: TObject);
begin
       ed3.Text:=ed1.Text+' '+ed2.Text;
end;
procedure InitializeWizard();
begin
       myPage:=CreateCustomPage(wpWelcome, '标题:自定义页面', '描述:这是我的自定义页面');
       myBtn:=TButton.Create(myPage);
       myBtn.Parent:=myPage.Surface;
       myBtn.Caption:='点我~';
       myBtn.OnClick:=@ClickmyBtn;
       ed1:=TEdit.Create(myPage);
       ed1.Parent:=myPage.Surface;
       ed1.Top:=myBtn.Top+30;
       ed1.Width:=myBtn.Width;
       ed2:=TEdit.Create(myPage);
       ed2.Parent:=myPage.Surface;
       ed2.Top:=ed1.Top+30;
       ed2.Width:=myBtn.Width;
       ed3:=TEdit.Create(myPage);
       ed3.Parent:=myPage.Surface;
       ed3.Top:=ed2.Top+30;
       ed3.Width:=myBtn.Width;
end;
Inno Setup类参考(5)
单选按钮
var
myPage:TwizardPage;
radio1,radio2:TRadioButton;
lbl:TLabel;
font:TFont;
{radio1的事件响应过程}
procedure ClickRadio1(Sender: TObject);
begin
lbl.Font.Color:=clRed;
end;
{radio2的事件响应过程}
procedure ClickRadio2(Sender: TObject);
begin
lbl.Font.Color:=clBlue;
end;
procedure InitializeWizard();
begin
myPage:=CreateCustomPage(wpWelcome, '标题:自定义页面', '描述:这是我的自定义页面');
lbl:=TLabel.Create(myPage);
lbl.Parent:=myPage.Surface;
lbl.Caption:='改变单选按钮的选项,我就会变色';
radio1:=TRadioButton.Create(myPage);
radio1.Parent:=myPage.Surface;
radio1.Caption:='红色';
radio1.Top:=lbl.Top+20;
font:=TFont.Create();
font.Color:=clRed;
radio1.Font:=font;
radio1.OnClick:=@ClickRadio1;
radio2:=TRadioButton.Create(myPage);
radio2.Parent:=myPage.Surface;
radio2.Caption:='蓝色';
radio2.Top:=radio1.Top+20;
font.Color:=clBlue;
radio2.Font:=font;
radio2.OnClick:=@ClickRadio2;
end;
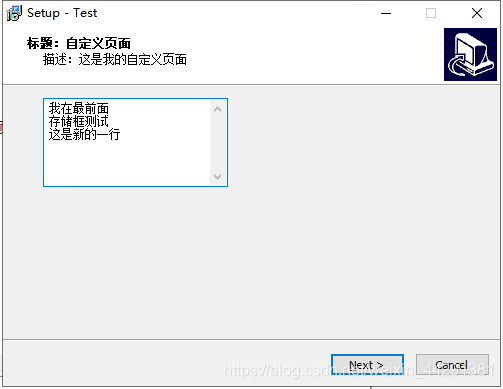
存储框
var
	myPage:TwizardPage;
	radio1,redio2:TRadioButton;
	mm:TMemo;
procedure InitializeWizard();
begin
	myPage:=CreateCustomPage(wpWelcome, '标题:自定义页面', '描述:这是我的自定义页面');
	mm:=TMemo.Create(myPage);
	mm.Parent:=myPage.Surface;
	mm.Text:='存储框测试';
	mm.Lines.Add('这是新的一行');
	mm.Lines.Insert(0,'我在最前面');
	mm.Lines.Add('请删除我,第四行');
	mm.Lines.Delete(3);
	{行号从0排起,插入到前面}
	mm.WordWrap:=True;{自动换行}
	mm.WantTabs:=True;{接受Tab键}
	mm.WantReturns:=True;{换行}
	mm.ScrollBars:=ssVertical;{滚动条}
end;
Inno Setup类参考(7)
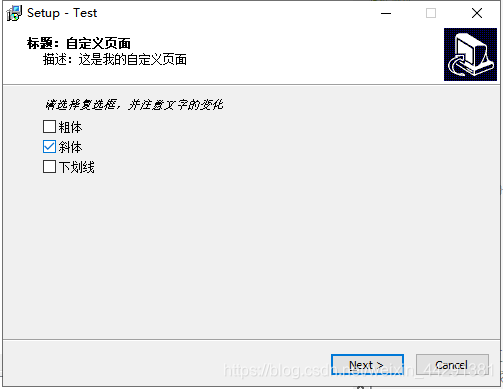
复选框(CheckBox)用于多个并不互斥的几个选项中作出一个或者多选择,例如字体可以有粗体、斜体和下划线,这三种状态可以任意组合,像这样的选项可以采用复选框实现。
[setup]
;全局设置,本段必须
AppName=Test
AppVerName=TEST
DefaultDirName="C:UsersouDesktop新建文件夹 (3)新建文件夹"
AppVersion=1.0
Compression=lzma2/max
ShowLanguageDialog=yes
UserInfoPage=yes
[files]
Source: "C:UsersouDesktop新建文件夹 (3)sourceElegoo 3D Print for test.exe"; DestDir: "{app}";
[code]
[code]
var
myPage:TWizardPage;
lbl:TLabel;
chk1,chk2,chk3:TCheckBox;
procedure ClickCHK1(Sender:TObject);
begin
if chk1.Checked then
lbl.Font.Style:=lbl.Font.Style+[fsBold]
else
lbl.Font.Style:=lbl.Font.Style-[fsBold];
end;
procedure ClickCHK2(Sender:TObject);
begin
if chk2.Checked then
lbl.Font.Style:=lbl.Font.Style+[fsItalic]
else
lbl.Font.Style:=lbl.Font.Style-[fsItalic];
end;
procedure ClickCHK3(Sender:TObject);
begin
if chk3.Checked then
lbl.Font.Style:=lbl.Font.Style+[fsUnderline]
else
lbl.Font.Style:=lbl.Font.Style-[fsUnderline];
end;
procedure InitializeWizard();
begin
myPage:=CreateCustomPage(wpWelcome, '标题:自定义页面', '描述:这是我的自定义页面');
lbl:=TLabel.Create(myPage);
lbl.Parent:=myPage.Surface;
lbl.Caption:='请选择复选框,并注意文字的变化';
chk1:=TCheckBox.Create(myPage);
chk1.Parent:=myPage.Surface;
chk1.Caption:='粗体';
chk1.top:=lbl.Top+20;
chk1.OnClick:=@ClickCHK1;
chk2:=TCheckBox.Create(myPage);
chk2.Parent:=myPage.Surface;
chk2.Caption:='斜体';
chk2.top:=chk1.Top+20;
chk2.OnClick:=@ClickCHK2;
chk3:=TCheckBox.Create(myPage);
chk3.Parent:=myPage.Surface;
chk3.Caption:='下划线';
chk3.top:=chk2.Top+20;
chk3.OnClick:=@ClickCHK3;
end;
Inno Setup类参考(8)
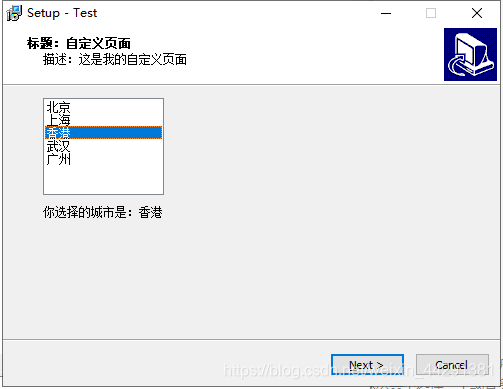
列表框(ListBox)是Windows应用程序中重要的输入手段,其中包括多个选项用户可以从其中选择一个或者多个,程序根据用户的选择做出相应的处理,列表框在外观上和存储框类似,但是行为却有很大的不同,列表框中项一般是预先给定的,而存储框则可以让用户进行输入,并且列表框中的项被选择之后也会触发事件。
[setup]
;全局设置,本段必须
AppName=Test
AppVerName=TEST
DefaultDirName="C:UsersouDesktop新建文件夹 (3)新建文件夹"
AppVersion=1.0
Compression=lzma2/max
ShowLanguageDialog=yes
UserInfoPage=yes
[files]
Source: "C:UsersouDesktop新建文件夹 (3)sourceElegoo 3D Print for test.exe"; DestDir: "{app}";
[code]
var
myPage:TWizardPage;
list:TListBox;
lbl:TLabel;

procedure ClickListBox(Sender:TObject);
begin
lbl.Caption:='你选择的城市是:'+list.Items.Strings[list.ItemIndex]
end;

procedure InitializeWizard();
begin
myPage:=CreateCustomPage(wpWelcome, '标题:自定义页面', '描述:这是我的自定义页面');
list:=TListBox.Create(myPage);
list.Parent:=myPage.Surface;
list.Items.Add('北京');
list.Items.Add('上海');
list.Items.Add('香港');
list.Items.Add('武汉');
list.Items.Add('广州');
list.OnClick:=@ClickListBox;
lbl:=TLabel.Create(myPage);
lbl.Parent:=myPage.Surface;
lbl.Top:=list.Top+list.Height+10;
end;
个性化 Inno Setup 协议页面
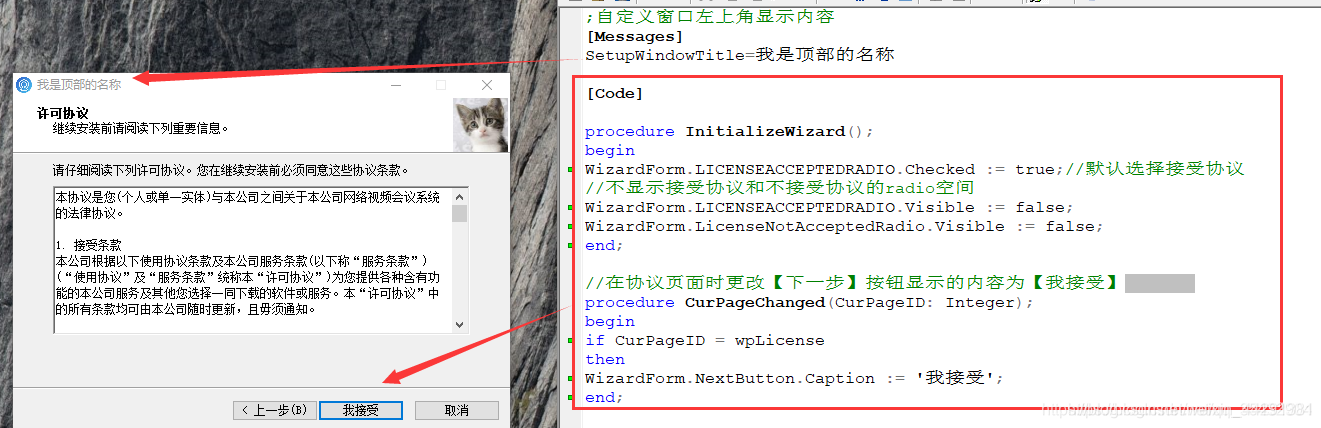
[setup]
;全局设置,本段必须
AppName=Test
AppVerName=TEST
DefaultDirName="C:UsersouDesktop新建文件夹 (3)新建文件夹"
AppVersion=1.0
Compression=lzma2/max
ShowLanguageDialog=yes
//自定义许可协议
LicenseFile=C:UsersouDesktop新建文件夹 (3)source新建文本文档.txt
[files]
Source: "C:UsersouDesktop新建文件夹 (3)sourceElegoo 3D Print for test.exe"; DestDir: "{app}";
[Messages]
SetupWindowTitle=我是顶部的名称
[code]
procedure InitializeWizard();
begin
WizardForm.LICENSEACCEPTEDRADIO.Checked := true;//默认选择接受协议
//不显示接受协议和不接受协议的radio空间
WizardForm.LICENSEACCEPTEDRADIO.Visible := false;
WizardForm.LicenseNotAcceptedRadio.Visible := false;
end;
//在协议页面时更改【下一步】按钮显示的内容为【我接受】
procedure CurPageChanged(CurPageID: Integer);
begin
if CurPageID = wpLicense
then
WizardForm.NextButton.Caption := '我接受';
end;
Inno Setup 安装前卸载原程序
[Code]
function InitializeSetup(): boolean;
var
  ResultStr: String;
  ResultCode: Integer;
begin
  if RegQueryStringValue(HKLM, 'SOFTWAREMicrosoftWindowsCurrentVersionUninstallAPP_NAME_is1', 'UninstallString', ResultStr) then
    begin
      ResultStr := RemoveQuotes(ResultStr);
      Exec(ResultStr, '/silent', '', SW_HIDE, ewWaitUntilTerminated, ResultCode);
    end;
    result := true;
end;
添加管理员权限使用dll(1)
[setup]
;全局设置,本段必须
AppName=Test
AppVerName=TEST
DefaultDirName="C:UsersouDesktop新建文件夹 (3)新建文件夹"
AppVersion=1.0
Compression=lzma2/max
ShowLanguageDialog=yes
LicenseFile=C:UsersouDesktop新建文件夹 (3)source新建文本文档.txt
[files]
Source: "C:UsersouDesktop新建文件夹 (3)sourceElegoo 3D Print for test.exe"; DestDir: "{app}";
[Messages]
SetupWindowTitle=我是顶部的名称
[code]
var
myPage:TWizardPage;
Button :TNewButton;
Cnt:Integer;
function GetCurrentProcessId(): Integer;
external 'GetCurrentProcessId@C:WindowsSystem32kernel32.dll';
procedure ButtonOnClick(Sender: TObject);
begin
  MsgBox(IntToStr(GetCurrentProcessId()), mbInformation, mb_Ok);
end;
procedure InitializeWizard();
begin
myPage:=CreateCustomPage(wpWelcome, '标题:自定义页面', '描述:这是我的自定义页面');
Button := TNewButton.Create(mypage);
Button.Width := ScaleX(75);
Button.Height := ScaleY(23);
Button.Caption := 'TNewButton';
Button.OnClick := @ButtonOnClick;
Button.Parent := mypage.Surface;
end;